
Toilet installation
This updated installation page supplements and improves our printed instructions
Elements 1 – 7 below are dual flush valve + fill valve assembly highlights
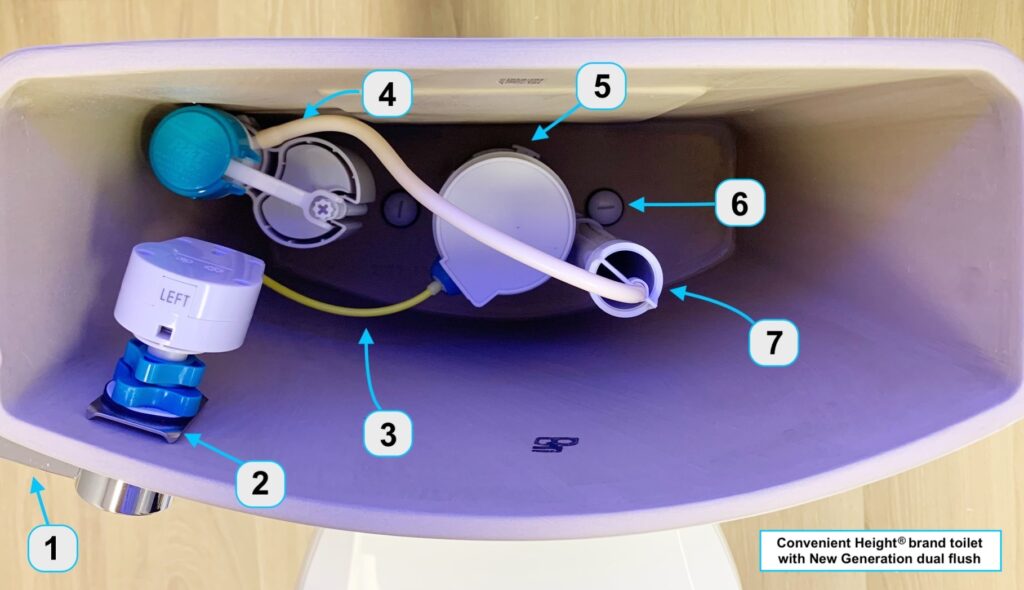
- (Element One) Flush lever handle to allow two directional movement once connected to the actuator. Lever dual flush functions are: lift handle up for less water and press down for a full flush. Ensure the up/down motion of the handle as lever metal key rod is inserted into the actuator. The handle remains horizontal once connected to the actuator.
- (Element Two) Placement line up of the large metal bracket direct to porcelain, followed by a rubber washer and a slim white washer. Tighten all three with the large blue spinner. Followed the step (1) the actuator blue spinner secures the handle to the actuator.
- (Element Three) Yellow cord to remain minimally bent. Yellow cord housing protects a metal wire inside. Metal wire should move freely within its yellow protective housing when flush lever handle is pressed up and down.
- (Element Four) The fill valve tube remains clear of the fill valve float rising during water fill and during flush.
- (Element Five) Dual flush valve cylinder locks into the flush valve bracket. Position cylinder as shown
- (Element Six)The tank to bowl connector bolt remaining visible ensures valve bracket stays level. Visually the overflow tube should not block or interfere with the tank to bowl connector bolt
- (Element Seven) Overflow tube positioning as shown for no interference with the tank to bowl connector bolt.
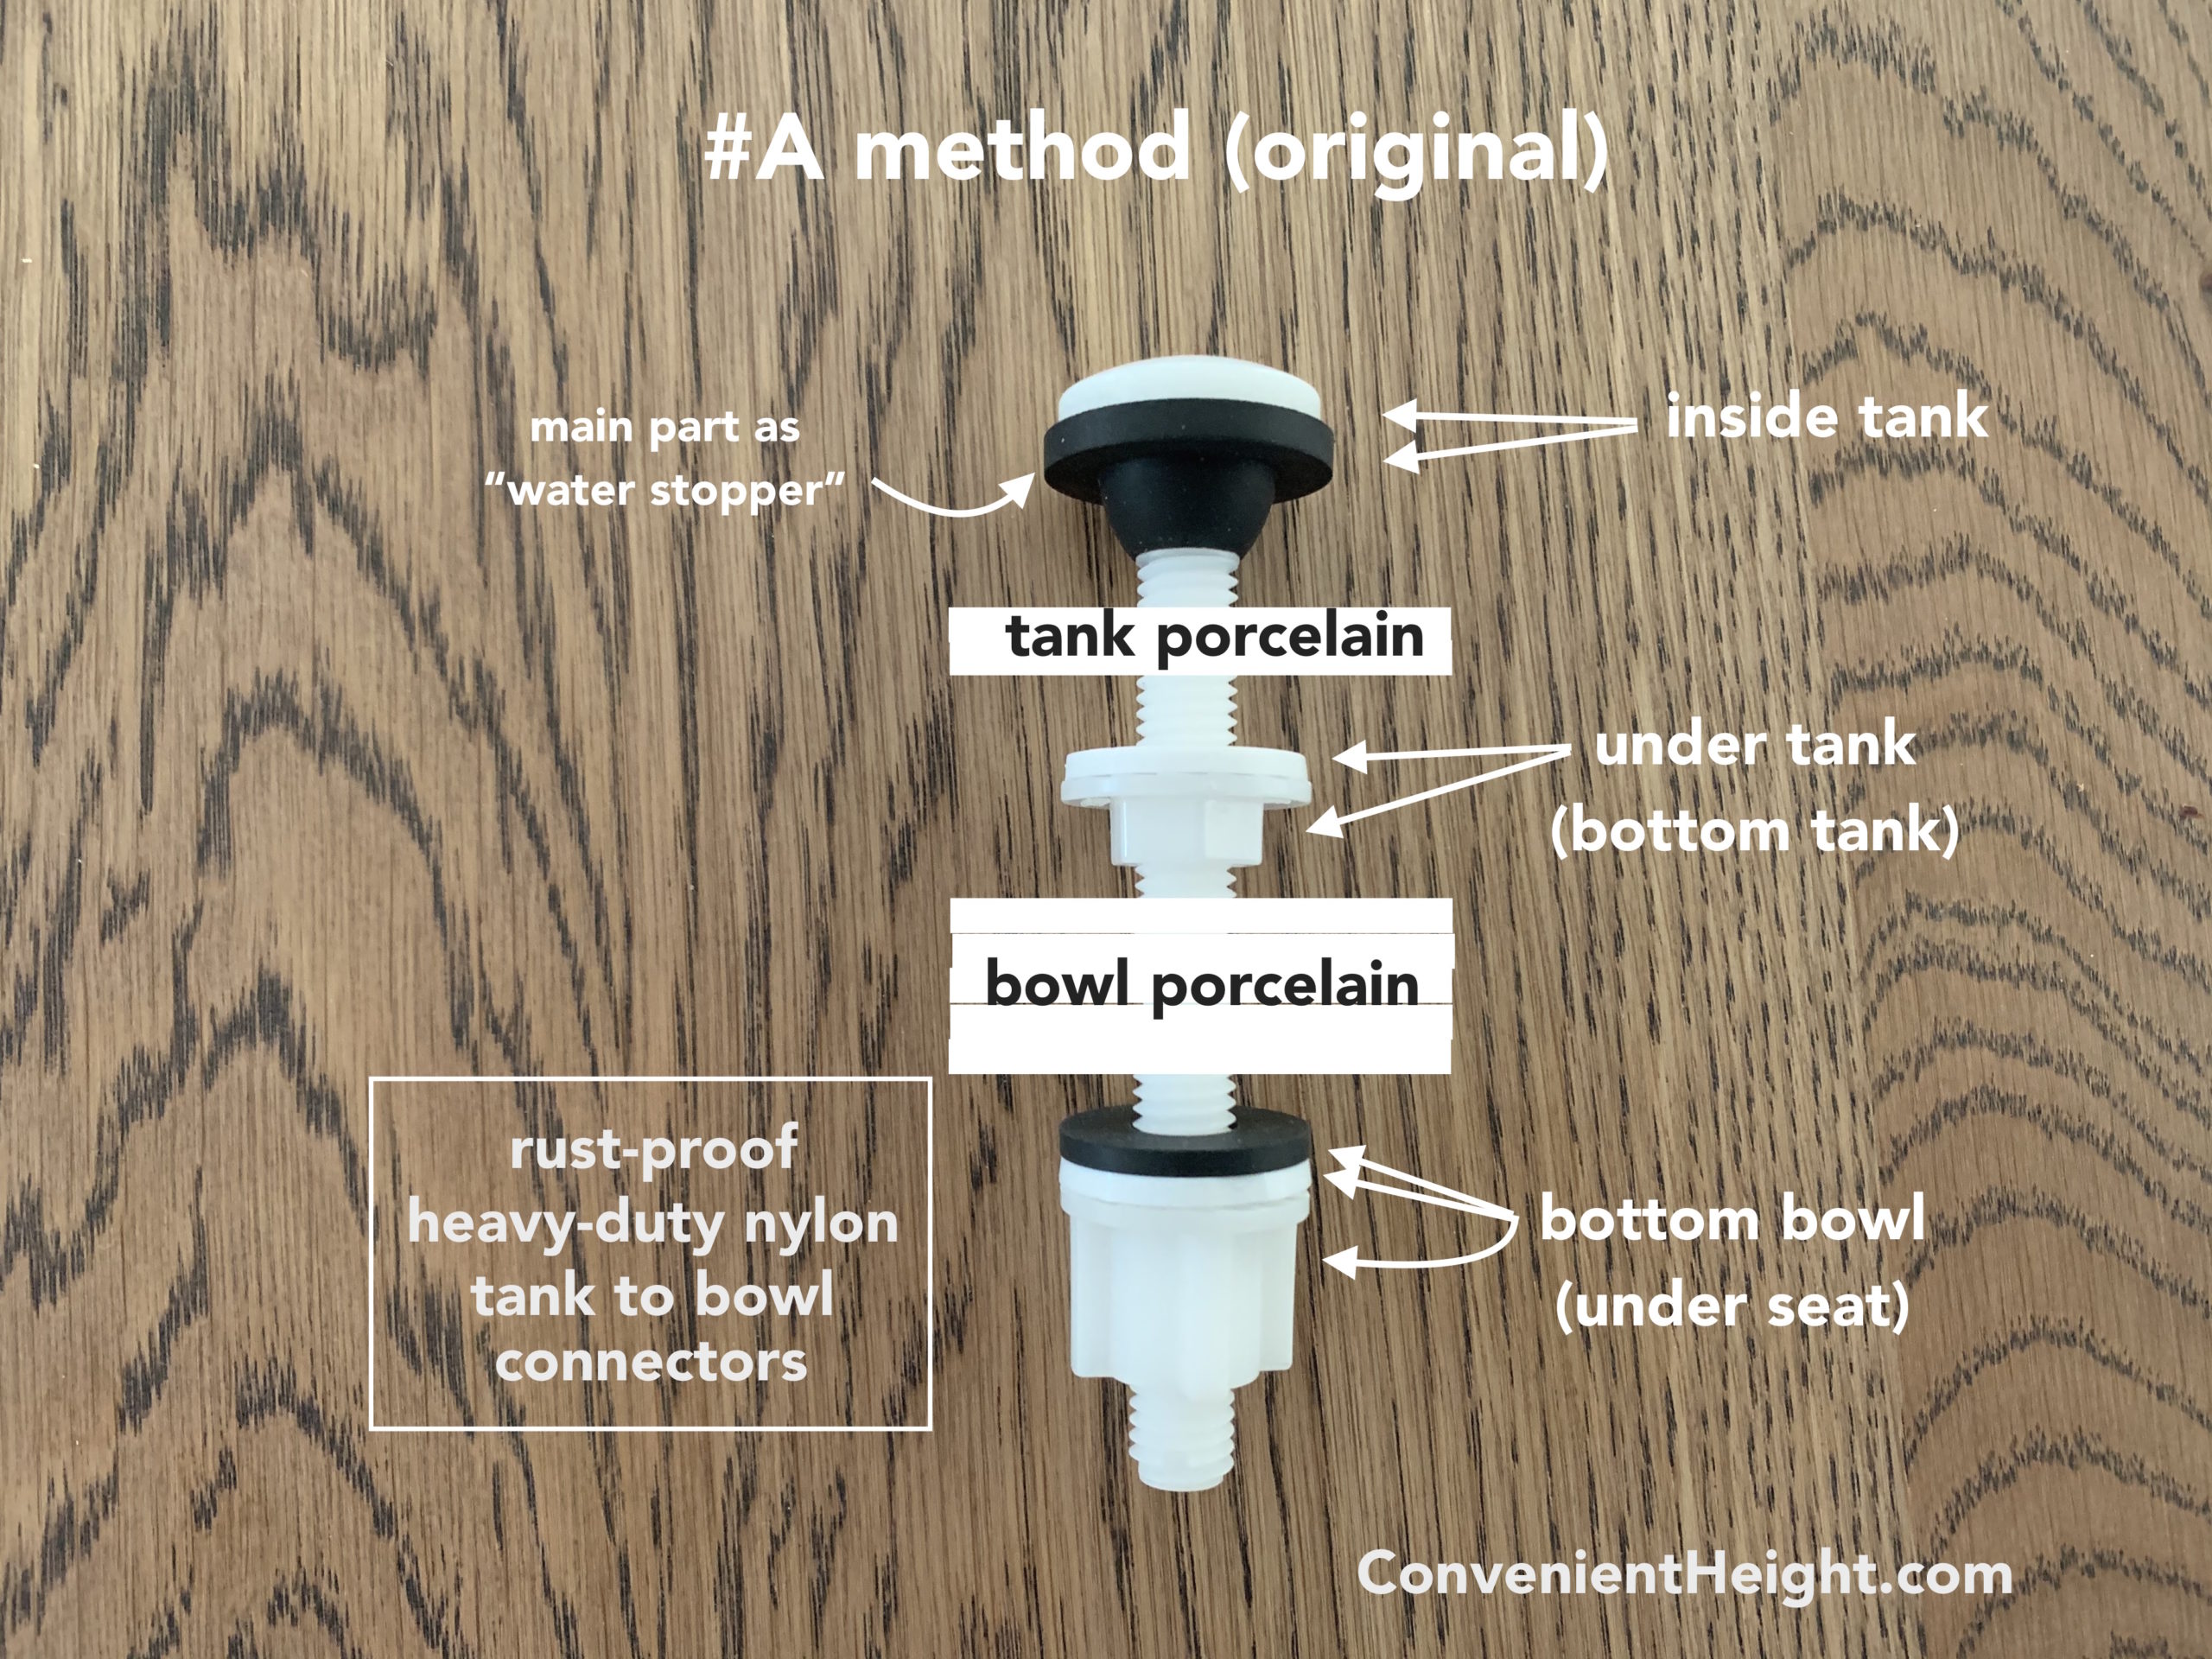
Tank to bowl Connector bolt element line up

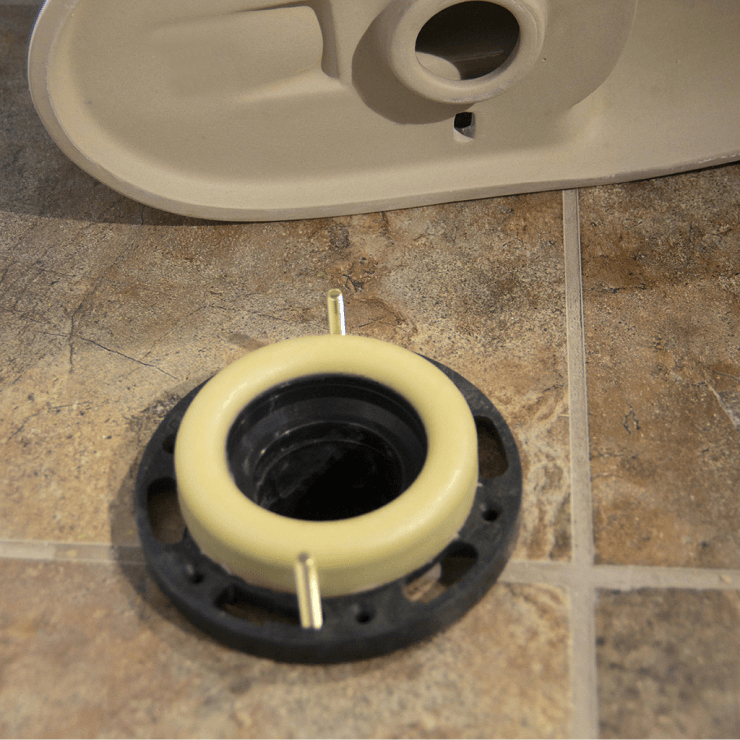
Sequence of tank to bowl connector screws (shown above). We supply a set of rust-proof heavy-duty nylon bolts for the tank to bowl connection. The great advantage of these (in addition to rust-proof material) is their partial flexibility. While some plumbers will always prefer metal screws, we see rust-proof heavy-duty nylon bolts as the new generation two-piece toilet tank-to-bowl connecting parts. The main large cone-shaped rubber piece will always go inside of the tank to hold the water from seeping through. Please see the #A diagram attached here below, called the “original”, because that is the sequence of how the screw parts will be aligned as they arrive to you.
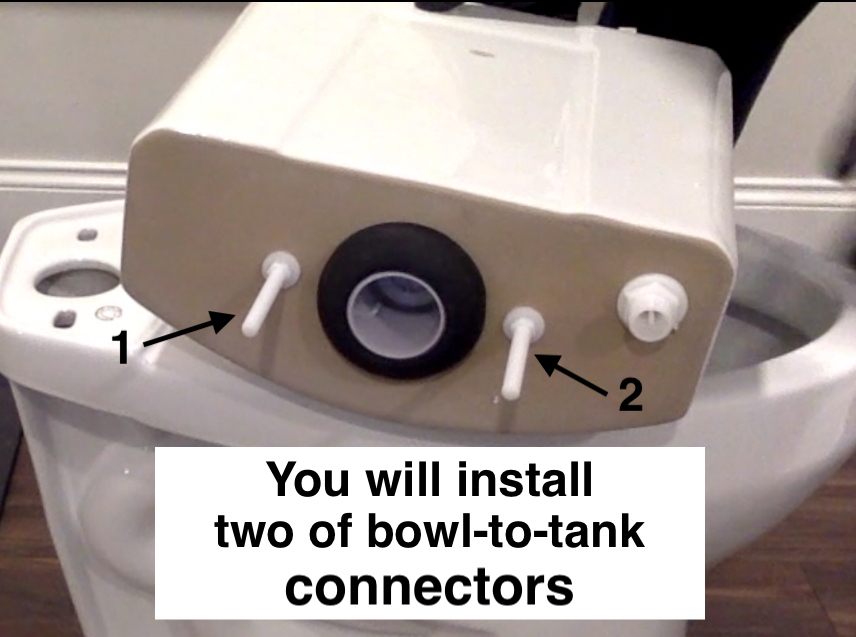
Video #1: Assembling tall toilet. This 15 minute video covers multiple details: a) assembling the tank (see Video #2 below for detailed instructions of connecting actuator to the handle/lever correctly; b) installing tank to bowl connectors and a rubber gasket; c) mounting the tank onto the bowl. Process covered in both video #1 and video #2 (see below) should take 1 hour.
Video #2: How to correctly connect dual flush actuator to the handle. The flush handle (lever) must perform a Dual action: handle up for less water, handle down for a full flush. There is only one way to connect the actuator to the handle correctly (and 2 ways to do it incorrectly).
If you need installation advice, please call 617-419-0814 (M- F 9am – 4pm EST)
Please note, all of the parts shown here have only become widely available starting September 28th, 2020. If your purchase is prior this date of 9/28/2020, the mechanism supplied was a bit different. However, this particular NEW mechanism is also available to you and we have this part in stock. For more information, please contact our very FRIENDLY Customer Care team.
The video is over 6 minutes long and we think it provides a lot of important advice about:
1) getting the dual flush valve positioned correctly
2) ensuring the dual flush cord is not bent
3) Metal handle positioning outside of the tank – prior securing the parts inside
4) Sequence of the handle securing parts inside of the tank
5) Actuator correct positioning and securing
6) Flush test
We supply a set of rust-proof heavy-duty nylon bolts for the tank to bowl connection. The great advantage of these (in addition to rust-proof material) is their partial flexibility. While some plumbers will always prefer metal screws, we see rust-proof heavy-duty nylon bolts as the new generation two-piece toilet tank-to-bowl connecting parts. The main large cone-shaped rubber piece will always go inside of the tank to hold the water from seeping through.
Please see the #A diagram attached here below, called the “original”, because that is the sequence of how the screw parts will be aligned as they arrive to you.
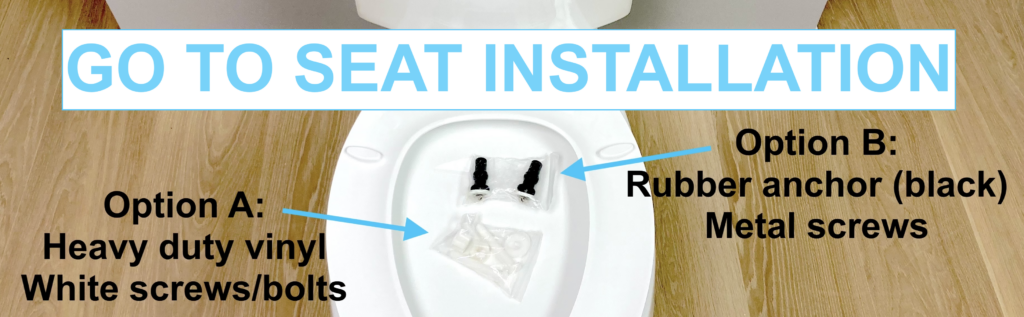
Toilet seat installation page.
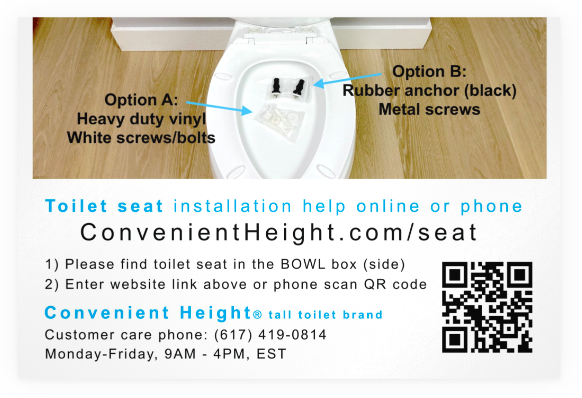
For your Model S tall toilet, please find the toilet seat within the bowl box, on the side of the styrofoam. Unpack it. Please follow our instructional images and notes here below.
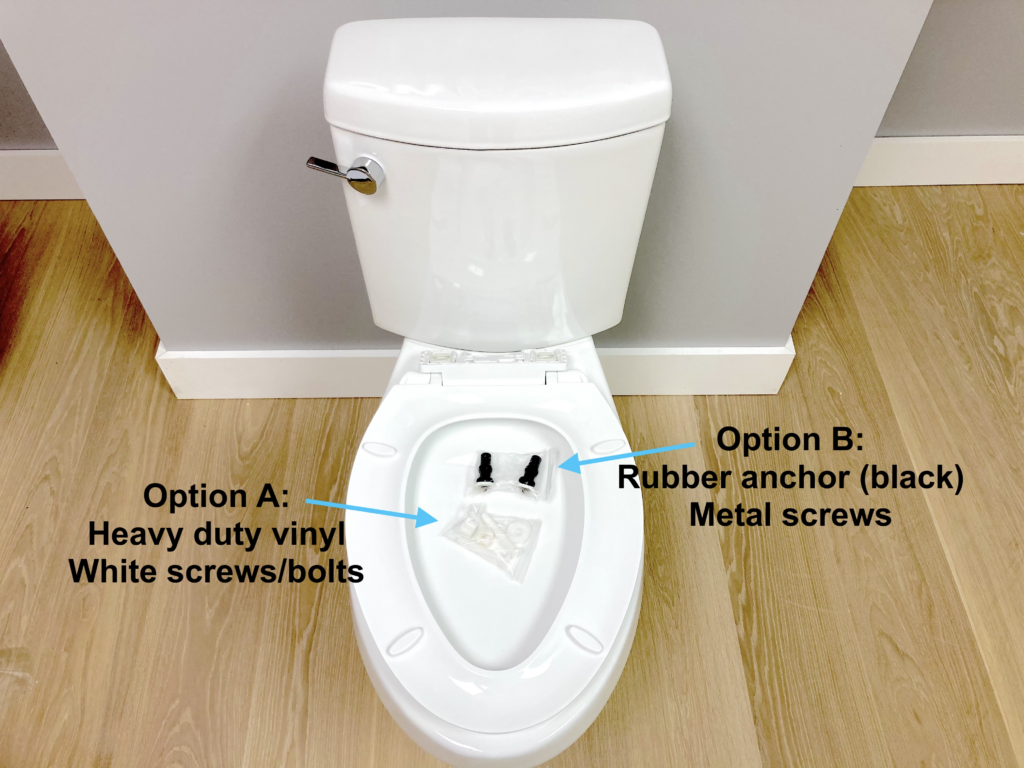
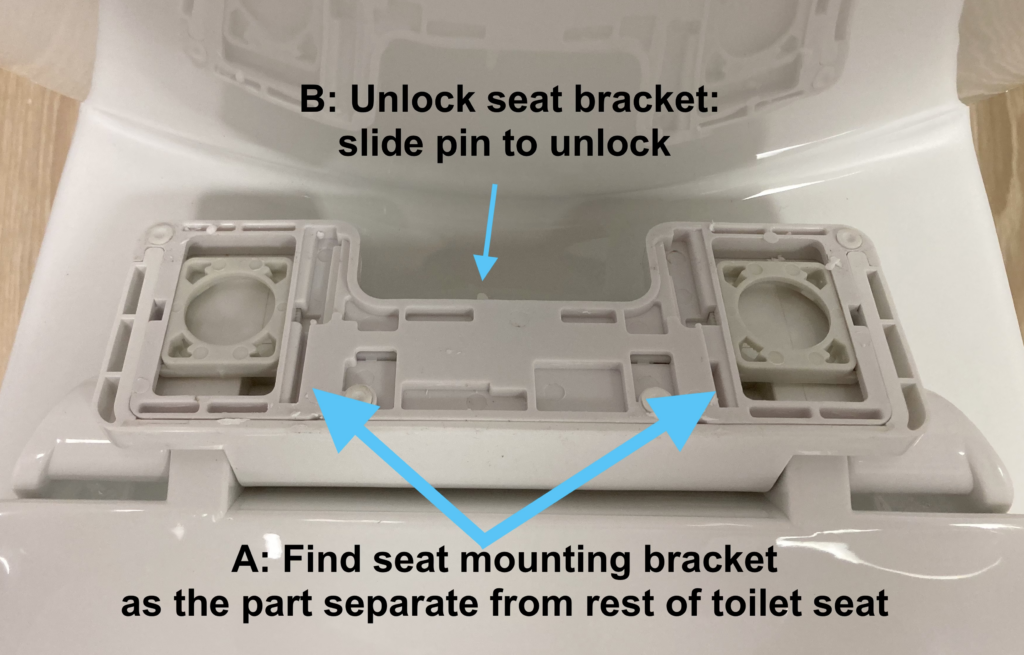
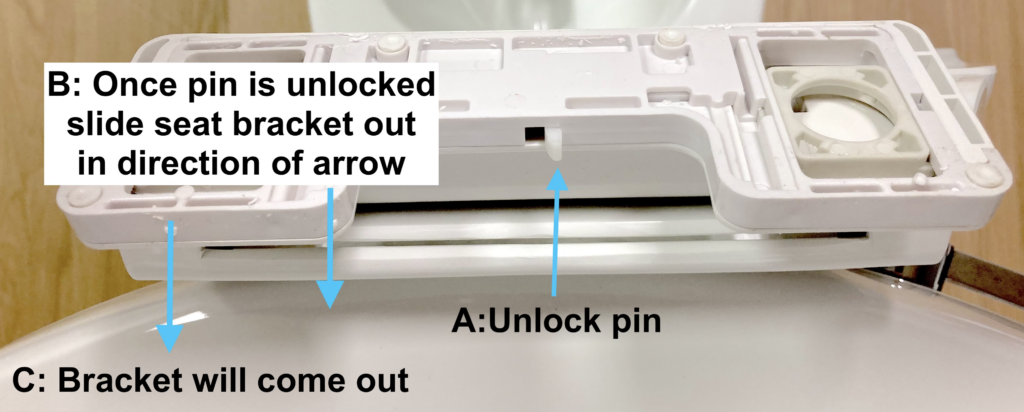
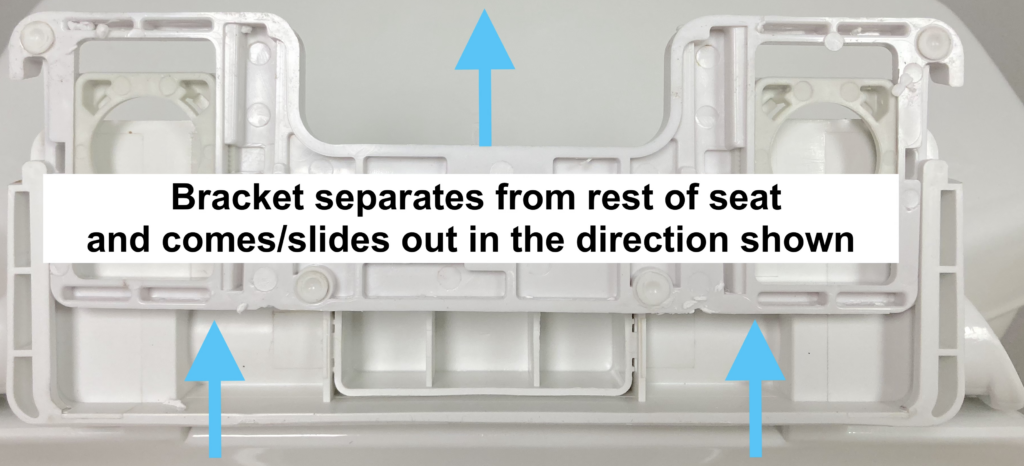
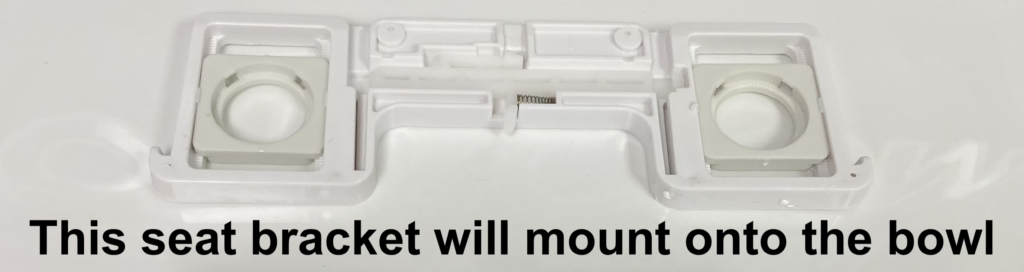
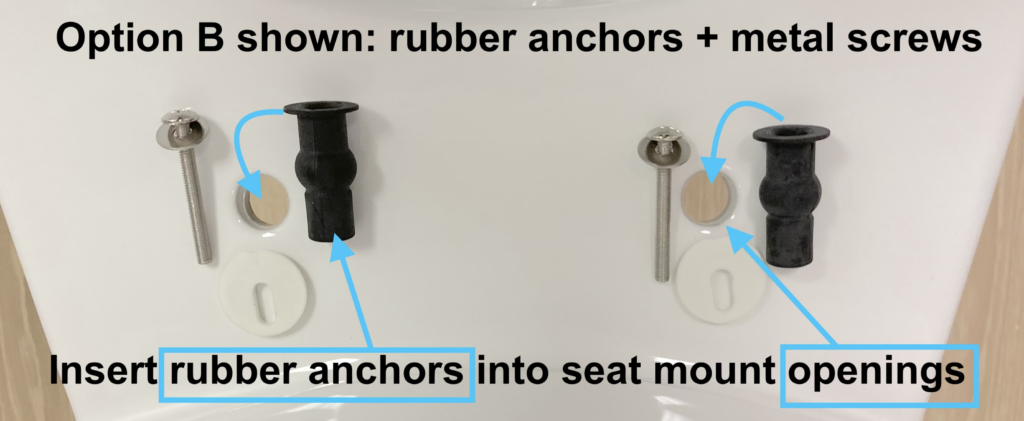
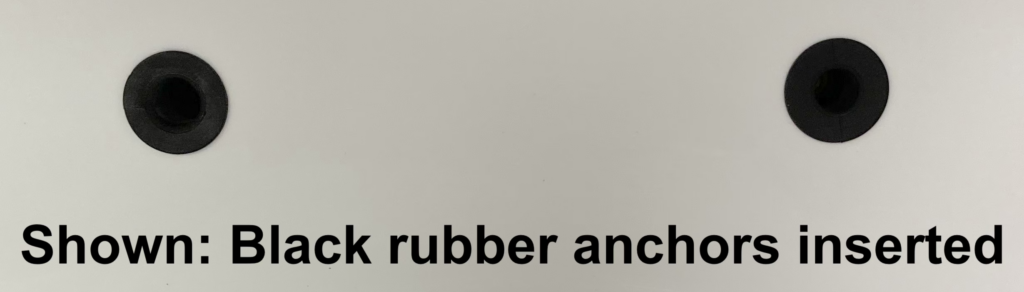
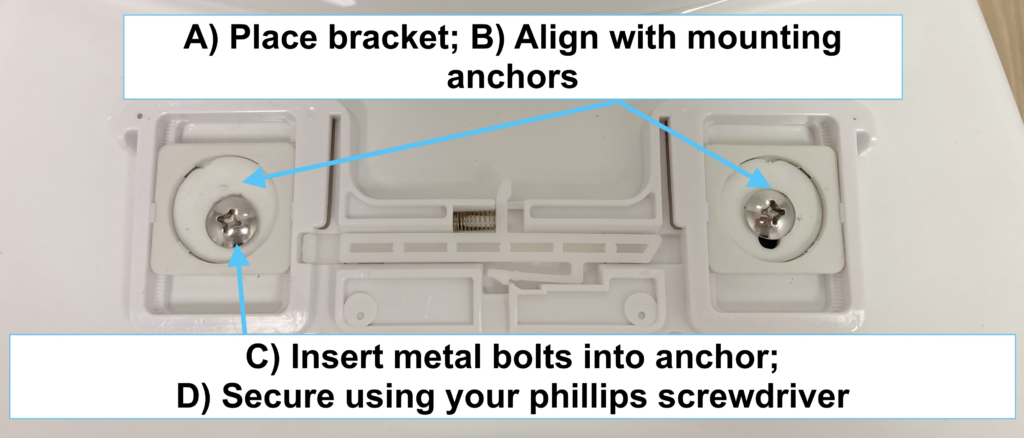
Here are two options for toilet seat installation: A and B shown
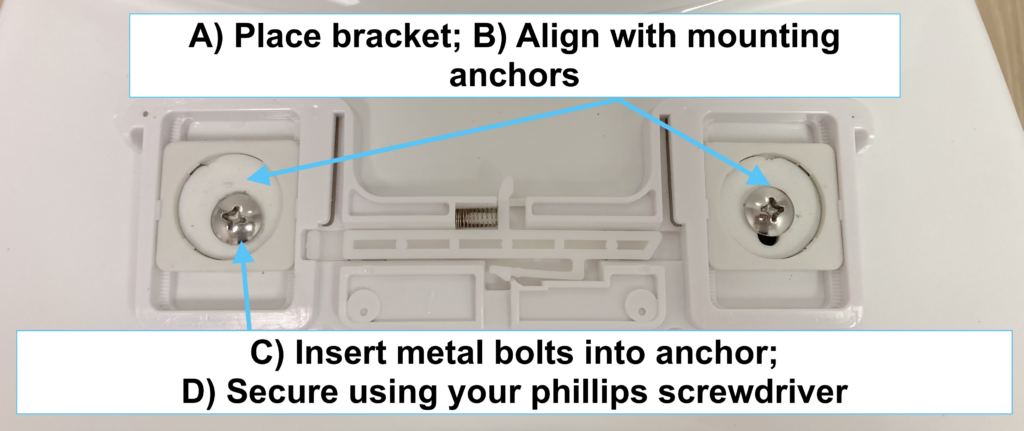
How to install toilet seat with metal bolts and rubber anchors (black)

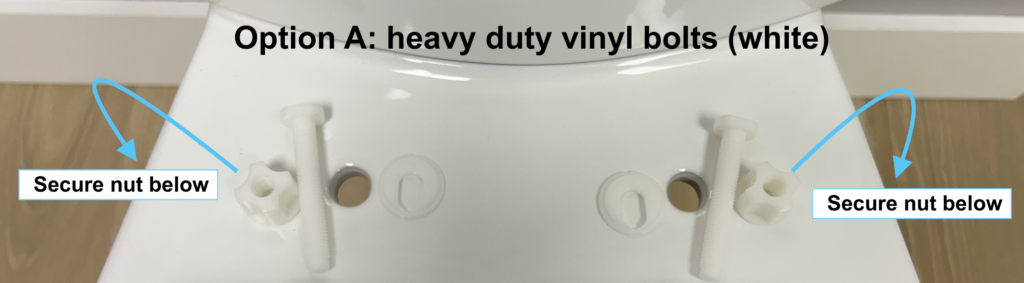
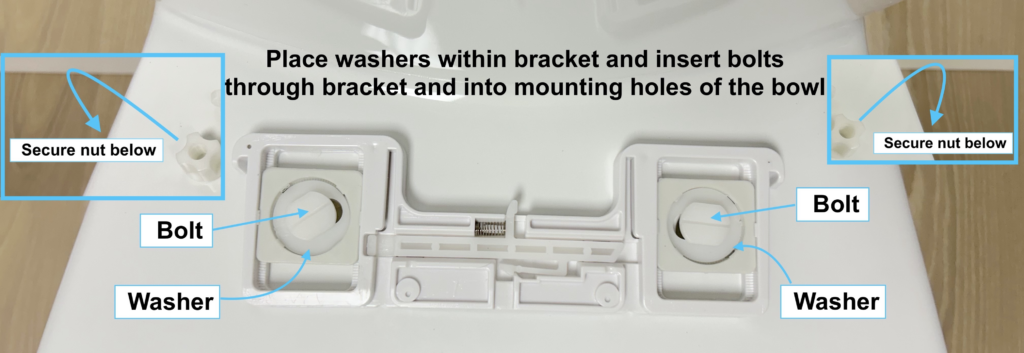
How to install toilet seat with Heavy duty vinyl bolts (white)
Well done!
This completes the installation of the toilet seat
For all other TOILET INSTALLATION help please see here
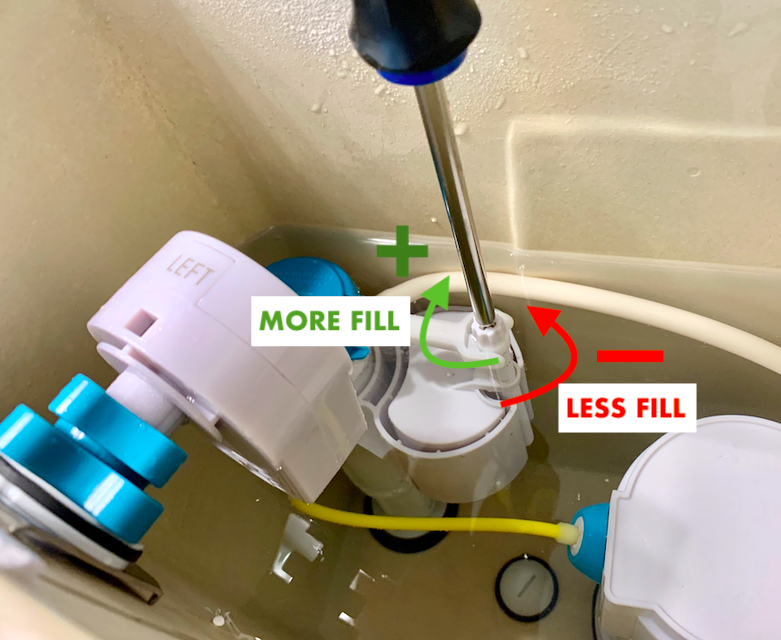
The fill valve adjusts to add more (or less) water during tank refill. Here is how:
No. While it is an inexpensive accessory, we do not provide/supply one purposefully, because toilet drains are different and there can be a bit different wax rings that will work best with different toilet drains. Our toilet itself does not require anything specific for the wax ring type. Our “bottom of the toilet” is universal from that perspective. The wax ring is not included with the parts we ship and must be purchased separately. Plumbers typically prefer their own type of wax ring and this is usually an installer decision, based on the type of drain and drain flange. A toilet wax ring is a simple part costing about $10. They can be jumbo, regular, with the plastic funnel/flange or without. Also can be rubber (non-wax) material. The installer will determine and select the wax ring based on the type of toilet drain and toilet drain flange.
A quick note from our customer care experience: Something to look for is to ensure a wax ring your plumber gets does not have too narrow of a plastic funnel on it. We have had a case or two, where the wax ring funnel was so narrow, the actual drain opening diameter was minimized by the wax ring alone – by two inches. So a wax ring created some obstruction to the drain and flushed contents could not go down easily. So we recommended for a plumber to look into replacing that wax ring with the wax ring without the funnel (wax only, no plastic funnel) and it resolved the problem. This will not be the case for all, but we thought it is worth a mention. Typically, there is never a big procedure with selecting the wax ring. Once your plumber takes a look at the toilet drain after removing the old toilet (or if it’s a new bathroom installation), they will know what to select.
Thank you for your question. To use the wording of your question for accuracy, the 20″ to bowl height is referring the floor to rim height before the seat is installed. And after the regular toilet seat is installed, floor to top of the seat height is 21 inches. We supply the seat with the order at no additional cost (slow-close seat exactly as shown in our product images). Our product is the first 20” – 21″ bowl in the U.S. approved by The Board of Registration of Plumber and Gas Fitters, Approval Code: P1-1118-172. Order with confidence as our state of the art packaging guarantees 100% safe delivery of toilet to buyer’s residence. Shipping time is 2-4 business days via Fedex or UPS, and orders are fulfilled from Massachusetts the same or next business day after the order is received. From Everyone here at the Convenient Height Company, thank you so much!
Convenient Height toilet installation is same as for any standard floor-bolted toilet. We always recommend using a licensed plumbing contractor for the installation.
Very many of our Convenient Height toilet buyers also choose to install a bidet. Without recommending one particular brand, we would like to here submit information from our FAQ section. Multiple buyers found the below measurements very useful when making the purchase of the bidet. 1) Distance between the seat mounting holes: 6 inches (hole center to center). 2) Nearest distance from the holes to the toilet tank: 2 inches (please note the tank is curved, so while the holes directly from the tank are 2.5 inches, the distance to look at is the 2 inch distance, which is what will determine if the accessory fill have enough room to fit in relation to the tank, once mounted). Please let us know if you’d have any further questions – we are here to assist you.
What make bidet will fit this toilet? – There are many bidet make brands that will fit this toilet extremely well. Very many of our buyers decide to install a bidet for this product which is great to see. For bidet right fit, please refer to the bidet size measurements and match to the measurements of our tall toilet bowl. One of the Amazon images for our listing provides the measurements of the toilet and for any of the detailed measurements please refer to our website directly. Will any elongated toilet seat fit as replacement? – Yes This toilet is is handle difficult to replace being plastic? is it standard? – YES, this toilet has all standard replacement parts. We will repeat from above: Dual flush systems are based on plastic manufacturing as metal flush systems are corrosive. So technically, metal dual flush systems will never work as the metal parts corrode if submerged in water for a prolonger period. Please Google “Dual Flush Valve, Toilet, Plastic” to see that all major manufacturers produce dual flush systems made out of plastic only. Additional information:
Repair parts are very easily obtained for this toilet. Convenient Height 20 inch height toilet tank parts provided initially are fully compatible with standardized toilet parts available for 2-Inch Flush Valve Toilets. Toilet repair parts are easily obtained and interchangeable with 2 inch Flush Valve Replacement Kits widely available at hardware stores across the U.S. Technically, a pro plumber could even change out our current Dual Flush UPC rated mechanism with a single flush 2″ flush valve for a wider toilet lever handle selection (dual flush mechanisms do not have as many handle design choices as single flush levers, but our toilet is technically very universal to personalize with different flush handles or toilet seats if preferred). More information: Convenient Height provided flush valve and ballcock (float valve) are UPC rated and 1.28 GPF compliant (UPC – American National Standard, the Uniform Plumbing Code). This 20 inch height toilet is Board of Registration of Plumbers and Gas Fitters certified in full.

